Uploading Images to the Image Library
z There are many ways and places that you can upload images. Within every function that uses images you can upload a single image. Using the Image Library Image Uploader you can upload many images at once. Any image uploaded using other parts of the site is automatically put into the General category of the library. If you wish you can then use the Image Library and move these to other categories.
Uploading Images using the Image Library Function - Recommended
A) In the Black bar at the top of the screen click on the Library link.
B) Rollover Images.
C) Click on Upload Images.
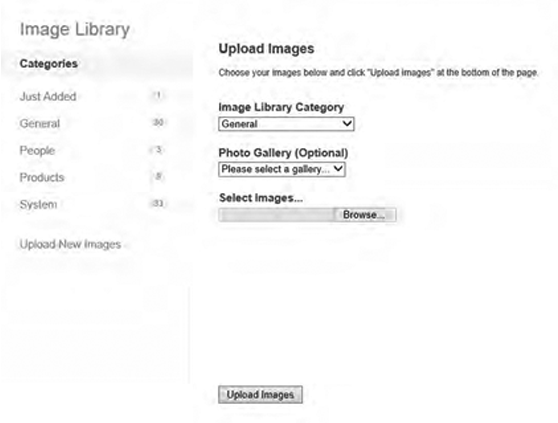
D) On the next screen, there are 2 main areas of interest.
Area 1 (the lefthand site)
This area holds all of the different Image Library categories that can hold different types of photos. You can choose what category your photos go into when you're uploading the photos.
Area 2 (the Righthand side)
This area holds the "Uploader" content. This is how you add multiple images at a time.
E) Select the Category that you want your images to be uploaded to. By default, they will go into the "General" Category.
F) The next field is the OPTIONAL Photo Gallery. If you're uploading images that you would like to go straight into a Photo Gallery, you can choose to here by choosing the gallery from the dropdown list. Please remember you need to create the gallery before you can upload images to it.
G) The next field is the OPTIONAL Service. If you're uploading images that you would like to go straight into a gallery on a Service page, you can choose to here by choosing the Service(s) from the list. Please remember you need to tag the service to show the photo gallery. See the item about services (click here) for details of this)
H) Next click on browse to select your images. Click on the filename of the image you wish to upload and click open. You can select multiple images in each directory. Once you return to the uploader screen you can click the Choose Images button again and select more images if you wish.
I) Click on Upload Images to perform the uploading process. Two green vertical bars will start showing and moving. These serve no other purpose than to reassure you that something is actually happening. When they stop moving and disappear completely the upload is complete and your images are ready to use in the website.
Once they have been loaded, click on Upload Images at the bottom of the webpage. The images will upload and you will be told when it is done. DO NOT LEAVE THIS SCREEN UNTIL UPLOAD IS COMPLETED
Image Library Hints and Tips
Do not try to upload hundreds of images in one go, it works, the system can handle it, but if for some reason there is a glitch and you have to start again. We recommend no more than 20 at a time.If you view an image in the Image Library you can replace it by uploading another image. This will replace every version of that image you have used on the website in one go, this saves you time.
Be organised with your galleries. If you have multiple services or sections in your product gallery, create an Image Category for each and upload the relevant images to it. This makes it easier to find them when you are putting them into a page of the website.